Rube Goldberg Machine
What is a Rube Goldberg Machine?
A Rube Goldberg Machine is a chain reaction-type mechanism that has the most amount of steps possible. The idea was inspired by the cartoons of a former mechanic named Rube Goldberg.
The Process
Building a Rube Goldberg Machine with a group was a very interesting process. It included, designing, building and redesigning the machine. The nine days it took were spread out over the course of about a month, which left a lot of time for thinking about how the machine could begin, transition, and end. In order to actually build the machine we began by making rough blueprints. Then we used the best aspects of the designs to make a more accurate blueprint. After this, we more or less followed these blueprints to build the machine. We redesigned and more completely designed the machine along the way. Below is our work log, which documented the raw building process:
Trick or Treat Construction Log
Day One: On the first construction day we put up the first domino platform and began the pulley systems.
Day Two: On the second day we finished the pulleys and started the attached the broomstick.
Day Three: On the third day, we worked out how the wedge would work and attached the wedge.
Day Four: On the fourth day we added in two more inclined planes.
Day Five: On the fifth day we planned and attached the screw on to the machine.
Day Six: On the sixth day we did some re-designing and finally found a way for the lever to trigger the wedge.
Day Seven: On the seventh day we put up supports to stabilize the machine.
Day Eight: On the eighth day we set up a way to catch the second marble, and tested the machine with the pieces that weren’t attached.
Day Nine: On the final build day, we decorated the machine and put it through a series of tests and fixed the remaining problems.
__________________________________________________________________________________________________________
The final goal of the machine is to put a candle into a Jack o' Lantern, and my group had to think about how the machine would lead up to that action. We began by deciding that the first step would be a tiny broomstick hitting a group of dominoes, which would set off the whole machine. This would hit a ball into a lever, which would raise a ghost and hit another marble. That marble would fall in a cup and hit a lever in order to trigger a pulley. The pulley would lower an axe and hit a ball into a screw. This ball would travel down the screw and another inclined plane and hit a set of dominoes. We finished by defining that the dominoes would knock the candle into the Jack o' Lantern. Below is our machine in action as well as the calculated physics:
The Physics Of Trick or Treat
1. In order to make the first domino fall, the broomstick needs to carry a force of 0.75N.
2. The dominoes then topple. Toppling: If the center of gravity is above the area of support, the object will topple (fall over).
3. The marble, with a mass of 0.012kg gets knocked into a cup on a pulley. The pulley’s mechanical advantage is 1.
4. The cup hits another marble (0.0163kg) down an inclined plane, with a mechanical advantage of 0.2222. Marble has a potential energy of 0.0144J. PEg= 0.0163kg(9.8m/s2)(0.09m) = 0.0144J.
5. The marble, with kinetic energy of 0.0000815J, then hits a first-class lever, with a mechanical advantage of 0.8. The marble exerts a force of 0.08N to move the lever. F= (0.0163kg)(9.8m/s2/2)) = 0.08N.
6. The lever then releases a wood block which is attached to a pulley(MA=1) that is raised up by a 0.099kg weight. The weight uses its downward movement to pull down the wedge(axe).
7. The wedge comes down with a force of 0.9702N and hits the marble into the screw(MA= 0.2356). F= 0.099kg(9.8m/s2) = 0.9702.
8. Then the ball rolls down an inclined plane(MA= 4.6923) at a velocity of 0.5m/s.
9. The ball carries a force of 0.75N to make the second set of dominoes topple.
10. The candle falls 0.3m into the jack-o-lantern, and in order to do so, the candle must be hit by the last domino so that it’s center of gravity is outside the area of support.
__________________________________________________________________________________________________________
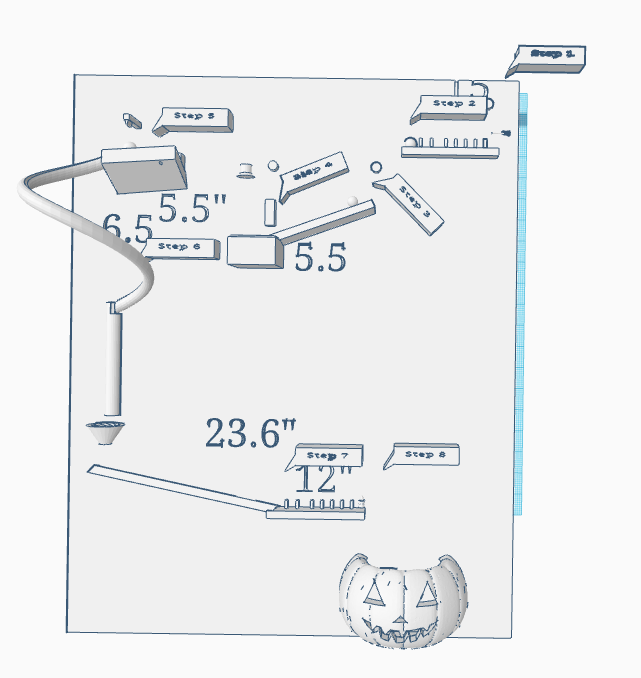
Sometimes, we had to fill in the blanks, by adding features to our machine to make it actually work. An example is when we had to design the axe. We used a popsicle stick and sheet metal to construct it. We had to screw it into a block attached to the board instead of just on the board due to balance and dimensionality. We also had to screw into the pulley twice in order to keep it stable. It was a lot of work, but in the end, it was all worth it. Below is the Blueprint for the Project:
Reflection
I learned many things, both about myself, and about skills when I helped build the Rube Goldberg Machine. I learned how to drill, screw, and cut wood. I learned to be more persevering and more understanding of others' strong feelings. I also learned that, sometimes, if others agree, it's better to go with the flow than to enforce your own trivially different ideas. I could have contributed to the physics and designing of the machine a little bit more than I had. In my humble opinion, our machine and presentation ended up being very good. However, the last couple of days of the project were too stressful due to things being left at school, at home, et cetera. Also, missing the two days when my group designed the machine was really unpleasant because I had really looked forward to the design phase. It was delightful when we ran the machine and it worked perfectly after weeks of construction and redesigning. It was also pleasant when we got to decorate the machine after it consistantly worked. I learned a lot of things in this project, and I hope to take these skills into my real life beyond high school.
